When you are learning how to sell on Amazon, you can’t underestimate the importance that PPC has on the way your business develops and grows over time. Amazon PPC is the very foundation of your position on Amazon. When you search for something on Amazon, some of the results will have a “Sponsored” tag on them.

This listing will be like any other listing, apart from the ¨Sponsored¨ tag. This is actually a very important clue as to how PPC affects the exposure of your products. The results for any search that are not sponsored, are organically ranked by that search term or “keyword.”. The more that people buy a product after finding it on a certain search, the higher it will rank on that search.
The Amazon A9 algorithm doesn’t treat a purchase from a sponsored listing any differently than one that’s in an organic listing. This means that if you have a product that’s on page 20 of a certain keyword, it will naturally get ranked higher (if you sell it frequently enough through a sponsored post on that keyword).
PPC is the way you get your product from being ranked at the bottom of every keyword on which you are indexed, to getting ranked in much higher positions. It will also help your product to get indexed on more keywords and be found in more searches.
The system works in such a way where you pick a number of targets, which can be keywords or actual ASINs (competitors´ listings). You bid for those targets on which your sponsored listings show up. This happens when an Amazon shopper searches for a matching keyword, or is viewing a competitor´s listing.

The Initial Setup
Amazon PPC is a very complex and intricate advertising system, and there are literally countless ways for you to configure and adjust your PPC structure. In this article we are only going to focus on the initial setup for creating your first campaigns for a new product.
Your PPC structure is something that’s an integral part of your Amazon business, and over time it should grow and evolve from the data you get back. There are a number of ways from which you can start things off and build. We are going to cover a structure that’s basically geared for 2 things:
- Market testing your new product (testing your productś chance of success)
- Establishing the most productive and cost-effective foundation to facilitate the growth of sales, and exposure of your new product
Keywords
For the initial setup you should only focus on keywords, rather than on both advertising on keywords (Keyword targeting), and ASINs (Product targeting). This is because if you advertise on a competitor´s product, you will need to have a listing that’s attractive enough to actually pull attention towards your small advertisement when they scroll down.
This is a very valid approach. However, it is much more productive to get into this avenue of growth after you’ve gotten some reviews. This is why, at the very beginning, you should focus on keywords.
When it comes to which particular keywords, you should find a way to pick out keywords that “have to work,” as opposed to those that “might work.” The keywords that have to work are those that directly describe your product- keywords that are highly-relevant. Advertising on these keywords is what gives you the “proof of concept,” that you have a product worthy of investing more time and money. Think about it like this: if you are not able to sell your product to people that are specifically searching for that exact kind of product, you shouldn’t be selling it. Or at the very least, you should take a good look at your listing and do your best to optimize it until you can actually sell on those keywords.
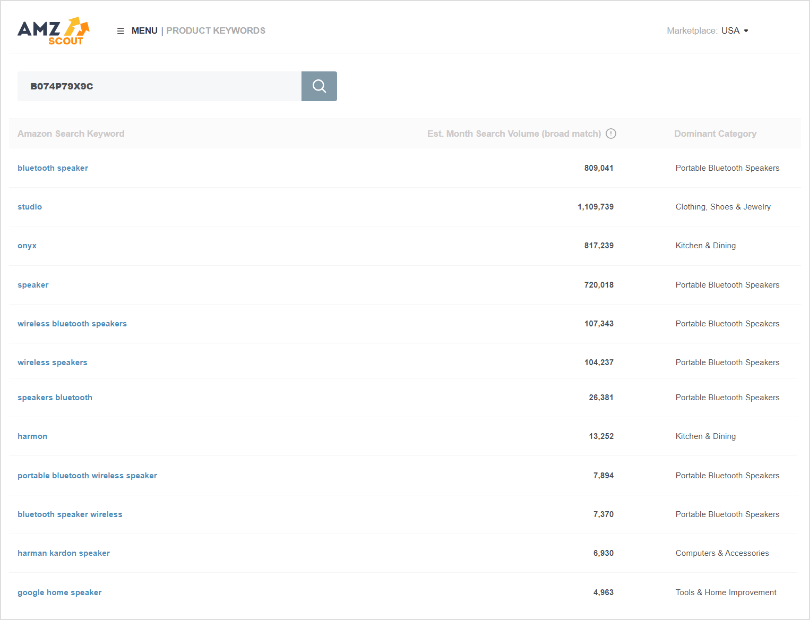
The best way to get those highly-relevant keywords is to find a product that’s similar to yours, and find the keywords on which that product is ranked highest. This is not something you can get without the use of software. Let’s say that we are selling a bluetooth speaker. We can simply copy and paste the ASIN into AMZScout´s product keywords, and get these results:
You can extract a CSV and pick out the keywords that are the most precise, thus you have your starting set of keywords. Before we get into creating those first few campaigns, we need to talk about match types.
Match Types
The keyword match types in Amazon PPC basically represent how specific or unspecific a set of keyword targets can be. There are 3 match types: Exact, Phrase, and Broad. They go from most to least specific. We are going to use the example of a bluetooth speaker to clarify.
As you can see, when you find a keyword at an exact match you will bid for when exactly that keyword or its plural is searched for.
Phrase match will bid you for any search where the original keywords are in the same order, with new words added to the back or the front.
Broad match will bid you for any search that only contains the keywords you put in your campaign, regardless of order or any other words contained in the search.
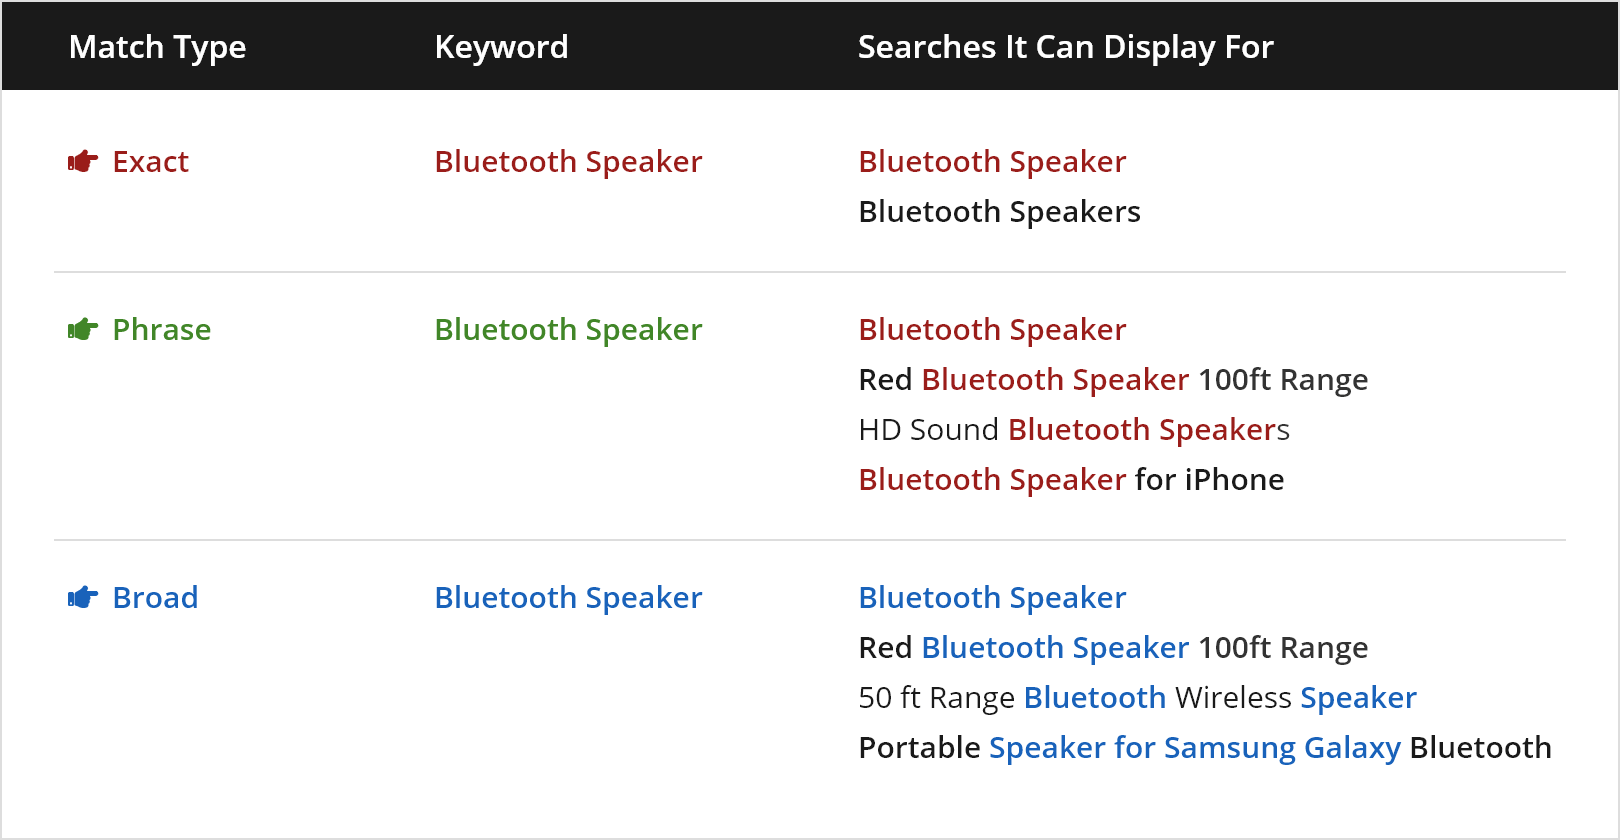
This is how PPC works in getting you additional keywords on which you can index. We can see in this example that the keyword, “Bluetooth Speaker,” is a short-tailed keyword, and all the rest that contain it are long-tailed keywords.
This is how you get indexed on more keywords- by advertising on long-tailed keywords that contain short-tailed keywords on which you are indexed. This is a synergy between your listing optimization and PPC.
The Campaigns
For your initial setup you will only need to create 2 campaigns- one with manual targeting, and one with automatic targeting. The difference between the 2 types is that in the first case, you hand pick your targets, and in the second, Amazon will pick targets for you based on the A9 algorithm’s criteria.
Let’s get into how you set-up your Manual Campaign:
- First, go to the advertising section of your Seller Central.
- Click on “Create new campaign”.
- Right after that, you should pick “Sponsored Products.” We are going to go with a campaign for the previous bluetooth speaker example.
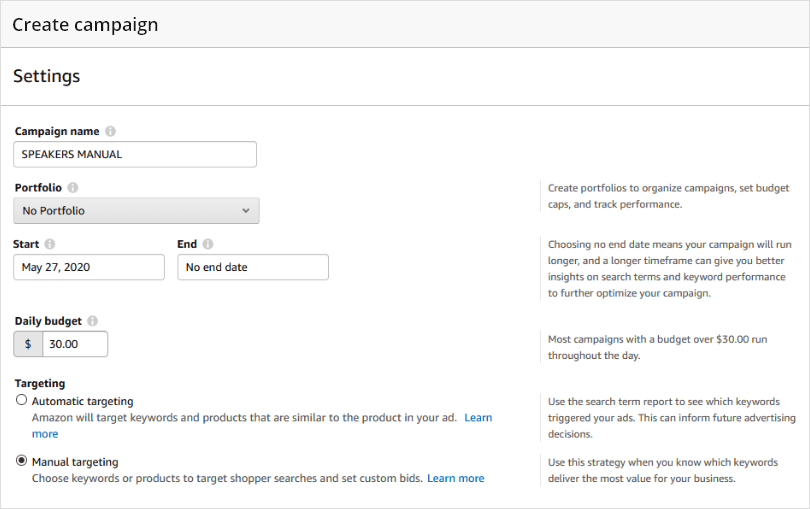
For the first part, you have to pick out a campaign name, a budget, and you need to choose whether the campaign will be manual or automatic. In this case, it will be manual.
The budget is up to you, but it shouldn’t be too high since your initial goal is to market test your product in the most cost-effective way. Also, it’s easy to ramp up the budget once you’ve figured out if it’s working or not. Since this campaign is going to have 3 ad groups ,or subsets, $10 for each is a very reasonable amount with which to start things off.
The next thing is your bidding strategy. There are 3 types of strategies, and the best one to start things off will be bidding down. This basically means that the cost of your click will not go over the amount you’ve put in, and that the system will prioritize getting the lowest bid possible.
You might not get as many impressions as you would with a more aggressive bidding strategy. Just keep in mind though, that the point is to simply show up on those searches enough times to be able to determine how well your listing is converting.
Next up is to name your ad group, which in this case will just be ¨EXACT.¨ Choose your product from the drop down, and pick keyword targeting instead of product targeting.
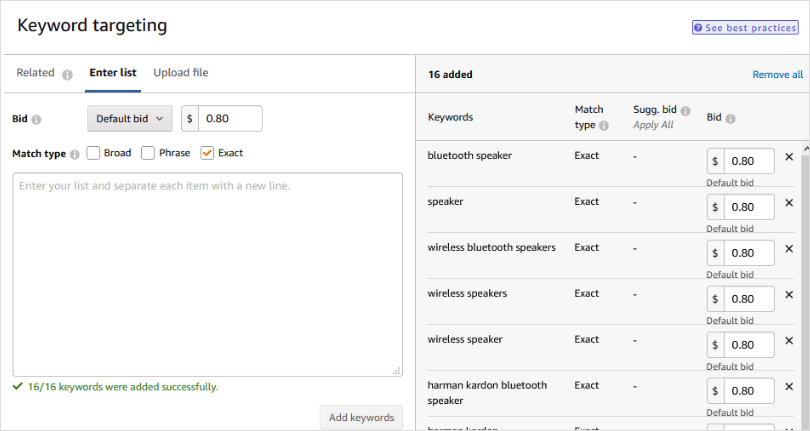
The next step after this will be to put in your keywords. You can extract a CSV or an EXCEL file and you can simply copy and paste them into the keyword window. Make sure you only select “exact,” and that you choose the default bid option.
As far as bids go, you should layer them. The bids for your exact match should be higher than the phrase match, and the broad match should be even lower. This is because you will be hitting more and more targets with each match type, the less specific they get.
The layering of bids helps you have more control over the spending. For this example, the bid will be $0.80 on exact, $0.60 on phrase, and $0.45 on broad. Once you put in your keywords, you are done with your first ad group.
After you create the campaign, you can go to “Edit campaign” and create the other 2 ad groups. Follow the same steps and put in the keywords at different, lower bids. The only difference in making the 2 additional ad groups will be in the use of negative keywords.
Negative keywords are basically specific targets you don’t want to hit, and they only have 2 match types- exact and phrase. What you will want to do is put the exact same keywords on negative exact match in the phrase ad group, and for the broad ad group- put them on negative phrase and exact.
This way each ad group will cover the same segment of all the possible targets you can get out of these keywords, and your ad groups will not bid against each other.

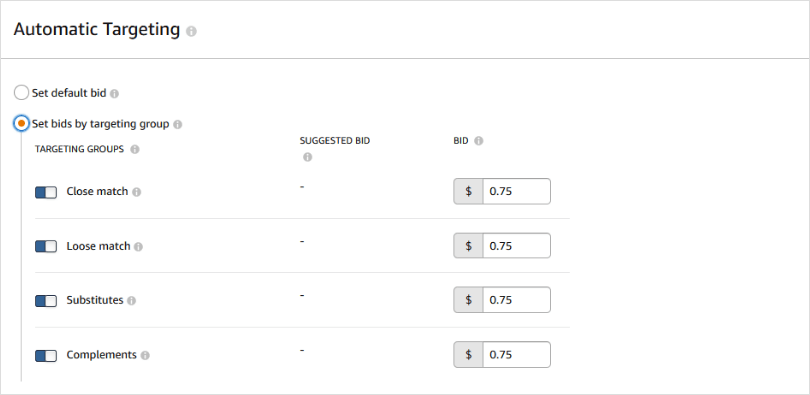
Setting up your automatic campaign will be very similar to the manual one with 1 exception: “automatic targeting option”. Here are the targeting options:
There are 4 types of targeting in automatic campaigns:
- Close match – keywords that are relevant to your product/niche
- Loose match – keywords that are somewhat relevant to your general product type, category, and substitute products
- Substitutes – Advertising on competitive listings that are direct competitors
- Complements – Advertising on competitive listings that are indirect competitors
Since we mentioned before that it’s not wise to advertise on competitors´ ASINs, and that we want to get as many relevant keywords as we can, you will turn off all the exact close match options. You will also put in all the keywords from the manual campaigns as negative exact phrases. This way you will increase the scope of relevant targets that you will hit, without bidding against yourself. You should also have a conservative budget of no more than $20 for starters.
In conclusion, in order to pursue the initial PPC goals for your new product, you need to be as cost-effective as possible. This is why you should put your bidding strategy as “bidding down,” and keep relatively low budgets. You only need to hit targets that are highly-relevant, and find ways to grow within the advertising space defined by them.
This is why you should use software to get the keywords that are most relevant to your competitors. Also, you should use less specific match types, as well as the auto campaign, to get as much out of those keywords as possible.
As time goes on, you will be able to identify targets that work and get more aggressive with your bids, as well as use data to build more complex, custom-tailored campaigns.
