
WordPress is and will remain the leading CMS in the web development industry. With 63.1% of CMS market share, the number of WordPress websites will only rise.
Unfortunately, that also means that the number of potential bugs and errors in websites rises too, which can be costly if you don’t know how to locate them.
Mistakes can cost you up to five times more if not detected before the site launches, and one hundred times more if discovered during maintenance! If those figures don’t alarm you about the importance of timely errors uncovered in your WordPress, we don’t know what will.
Testing your website is of paramount importance. It is something that you should not underestimate at any stage of the web development process. That’s why we’ve created this guide to tell you how you can test your WordPress website features like a pro would. Let’s start.
Develop a Plan
It does not matter whether it’s design or quality assurance. Failing to plan means that you’re planning to fail. It’s as simple as that. Proper planning saves time and prevents failures. It makes your website efficient, safe, and profitable. And most importantly, it allows the team to anticipate and overcome challenges, then fix and optimize where necessary.
How to Develop a Quality Assurance Plan for Your WordPress Site
In the above-quoted expert article, our QA whiz Martin Mitrev shared his thoughts on QA planning. According to him, these are the most important aspects to take into consideration when planning to test your WordPress website:
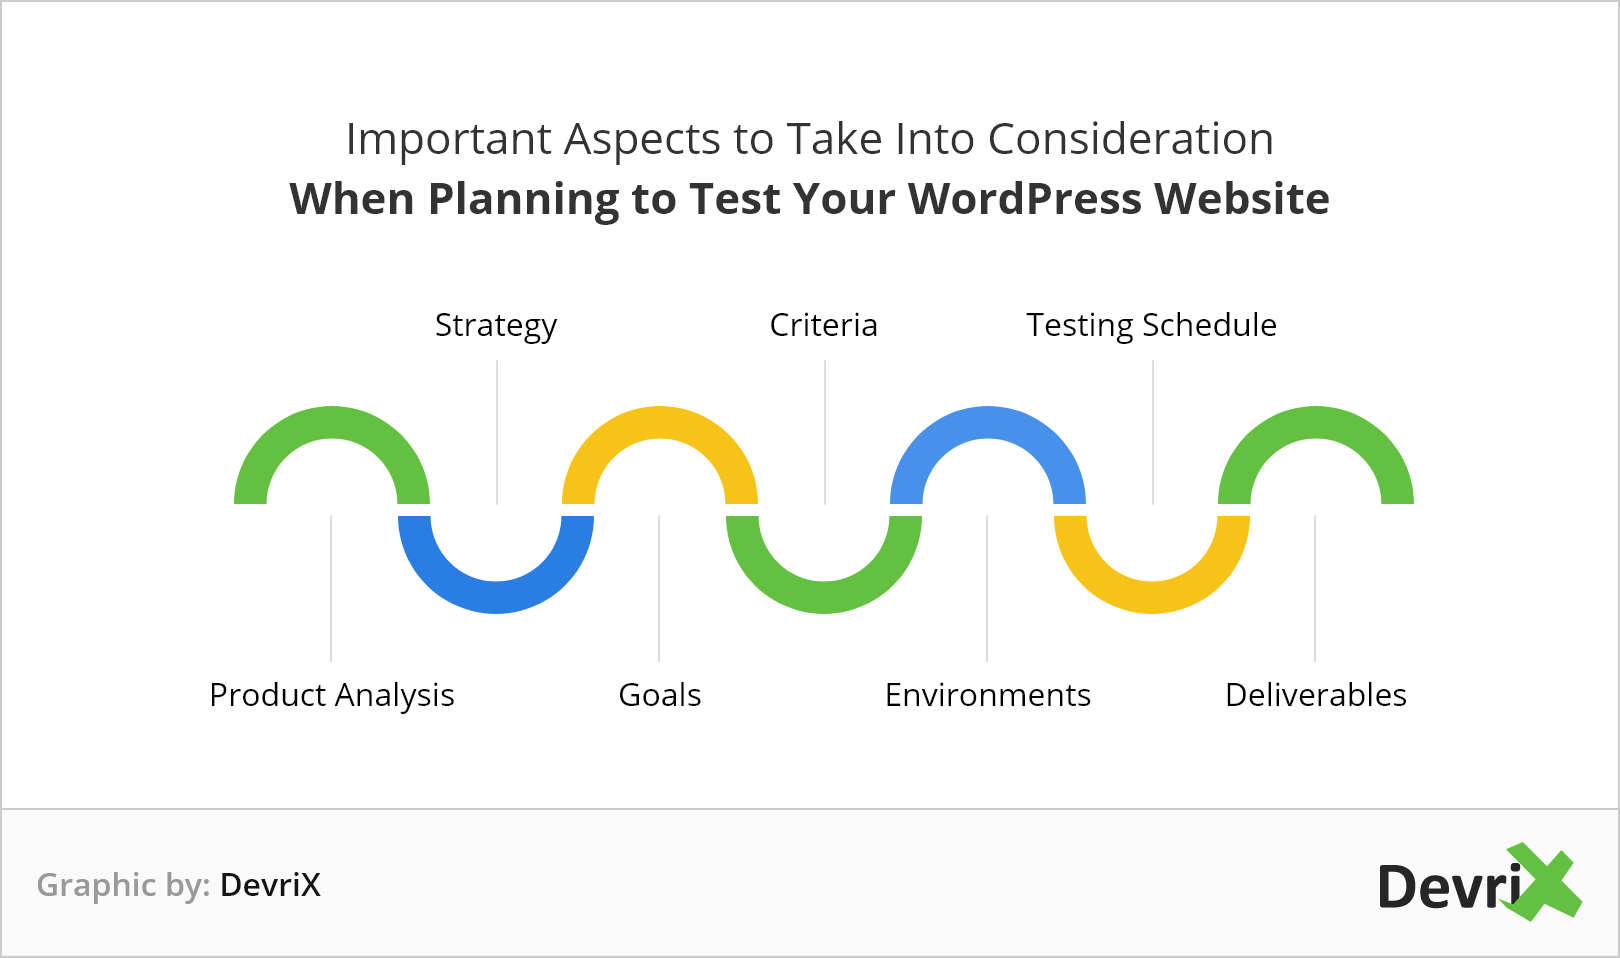
The essential factors to keep in mind when creating your WordPress testing plan.
- Product Analysis: Know precisely what you’ll test. Read the documentation thoroughly, learn everything about the site’s functions, who will use it, and how.
- Strategy: This is where a Test Manager steps in. He/she sets the testing goals, testing types, along with the required tasks, logistics, risks, and costs of the process.
- Goals: The main goal is to find every bug and error and fix it immediately. However, since there’s not a 100% bug-free website, focus on what needs to be tested and define the goals accordingly.
- Criteria: Define the criteria on which the entire testing process will be based. Have gradual criteria that need to be met at each stage, and exit criterias when the sufficient coverage from the tests is provided.
- Environments: A proper test environment includes each software, hardware, and network configuration component that is necessary for the required tests.
- Testing Schedule: What is the time needed for each test to be completed? Estimate the timeframe for each task, and add them up to estimate the required time. Create the testing schedule with a clear overview of the entire process, which in turn, will help the team meet their deadlines.
- Deliverables: Include each document, tool, and report that is necessary for supporting the tests. You can have three different deliverables that you need to set before the testing begins, ones during , and ones after the testing process ends for evaluation.
Testing the Functionality
The number one thing you must do to begin testing your WordPress site properly is to examine each functionality. Start with the following checklist:
Check the Database
Have you ever noticed the ‘Error establishing database connection’ warning when accessing one of your pages?

Uncover why database connections appear through testing, and prevent further damage.
This screen appears when your WordPress site can’t connect to its database. To avoid this, you need to ensure that the database has the correct credentials. This can be quickly confirmed by logging into your hosting account and examining the MySQL database’s name, username, and password.
If you’re having issues with the access, you can ask your WordPress hosting provider to verify that your database information is correct.
Test Every Link
Test every link on your website to see if they work appropriately and discover if you have any broken links lurking on your site. To uncover any broken outbound links, you can use tools such as SEMRush or Ahrefs.

Ahrefs Broken Links Checker: Test for broken links regularly to prevent users from questioning link credibility.
Test Buttons
The buttons on your WordPress website help you add user-focused CTAs and improve the navigation. Make sure that the links on the buttons are clickable and correct, and that the button placement follows the conversion rate optimization of your website.
Start with simple UX checks. First, make sure that the text in the buttons is correct. If the button is only there for a basic function such as ‘Back’ or ‘Submit’, don’t annoy the users by adding anything mysterious or comedic . It must be clear.
On the other hand, when it comes to calls-to-action, service, or landing pages, you need to be succinct, but also, enticing

Evernote: When customers are one click from signing up, don’t confuse them with the CTA. Test and ensure that it’s simple and inspires action.
Next up, make sure that each button is visible. When the users are on your website, the buttons must be recognizable immediately. Do not assume that everything is obvious.
Test Every Form
The forms on your website must always function properly, and testing them is the best way to make sure that they do. When checking the functionality of the forms, examine the following:
- Fields Label: Fll out the form with the required fields to see if you’ll get a warning notification. Ensure that the error message tells the users what the right input is.
- Fields Validation: Confirm that users enter the correct data in the form field. For example, the email and phone fields must be validated to make sure that the right data is entered. Also, make sure that the form cannot be submitted if the required fields are empty, which is the whole point of them being required.
- Auto-Response Message: Examine if the message is sent to the user that entered the data in the fields, and ensure that it’s correctly displayed.
Conduct Usability Testing
When approaching website testing, the process wouldn’t be complete without usability testing. After all, users navigate on websites quickly, and the majority of them won’t waste their time in discovering where to click on a given page.
According to Usability.gov, usability testing is defined as:
evaluating a product or service by testing it with representative users. Typically, during a test, participants will try to complete typical tasks while observers watch, listen and take notes. The goal is to identify any usability problems, collect qualitative and quantitative data, and determine the participant’s satisfaction with the product.
Usability matters because people will go to the next competitive website if yours is not usable enough. Your website can look like a Michelangelo sculpture, but still, users will leave if they can’t navigate it easily.
Developing the Usability Testing Plan
The plan is the outline of the entire testing process. It defines the tests, how you’ll perform them, how you’ll measure the success of the tests and the number of participants and scenarios that you will use. Accordingly, here’s what the usability testing plan must include:
- Goals: Specify the purpose of the test. For each test, you can have general and more precise objectives to concentrate on.
- Sessions: Define the number of testing sessions and their durations.
- Participants: Set the number of test participants and recruit them according to your testing needs.
- Cases: Define the types of tests and their scenarios. Include as much information as possible to help the team and participants to perform the correct tasks.
- Metrics: Define how you’re going to measure the users’ satisfaction with the usability, and the number of completions and errors in the tasks.
Recruiting Participants
For the usability test of your WordPress website to be successful, you’ll need participants that best depict your target users. If you provide more than one product/service, you’ll need to recruit users that represent the customers associated with the service.
In lots of cases, recruiting users for testing can be quite simple. If you own a retail website and you need people to check if navigating to the discounts and the best offers is easy, you can recruit people to test it out.
However, testing a SaaS developed on top of WordPress, you need to test it with a sample of potential users that are relevant to the industry.
Consider the requirements that participants need to fulfill so they are relevant to your WordPress project. You need experienced users that have used sites similar to yours, and that need the service/product that you provide.
An industry expert with experience in web usability is perhaps the best person to help you assess the usability of your WordPress site. You can either monitor the experts in person or have them conduct the tests on your site remotely and send you their evaluation.
Test the Website Navigation
When testing how the group of users navigate through your WordPress site, consider the following:
- Menus: Does each of your site menus take the users to the right destination? Is each option clear, readable, and user-friendly? Is opening a menu difficult?
- Labels: Is each button, icon, and label understandable enough? Don’t allow users to waste their time trying to understand what’s a button about.
- Information: How relevant is the content? Are you cluttering screens with too much content that does not allow the users to focus?
- Burden: How much effort is needed to consume the information and make a decision?
- Steps: Are the number of steps to get to a specific page too many? IDoes it confuse the users? Can you eliminate any of the steps?
- Design: Is the design and page layout helpful to users?
- Search: By using the search function, are users capable of locating the desired page or information? How can you make the process easier for them?
Remember that when it comes to design and navigation, people want simplicity on websites. Let’s take one of the most popular SEO tools in the marketplace, Ubersuggest, as an example:

Ubersuggest: A simple website navigation ensures that the users stay engaged.
Besides being one of the most helpful SEO tools out there, it’s quite simple to use, it’s relevant and intuitive. That’s what you need to achieve a good navigation of your site. If people can’t navigate it, they’ll go and search for one of your competitors instead.
Test Users’ Focus
Testing user focus allows you to discover if visitors follow your conversion funnel, and how useful your website is. You can track this by using tools such as Crazy Egg.
With this tool, you can record user behavior in real-time, and monitor where on the pages the users click or scroll the most. The more user attention tests you conduct, the better you’ll optimize your WordPress site to target customer’s needs.
Analyze Results
Turning the user testing reports into actionable and carefully analyzed steps might sound overwhelming, but it doesn’t have to be. You just need to know what to look for and organize your data correctly.
Here’s how you can properly analyze the usability testing results for your WordPress website:
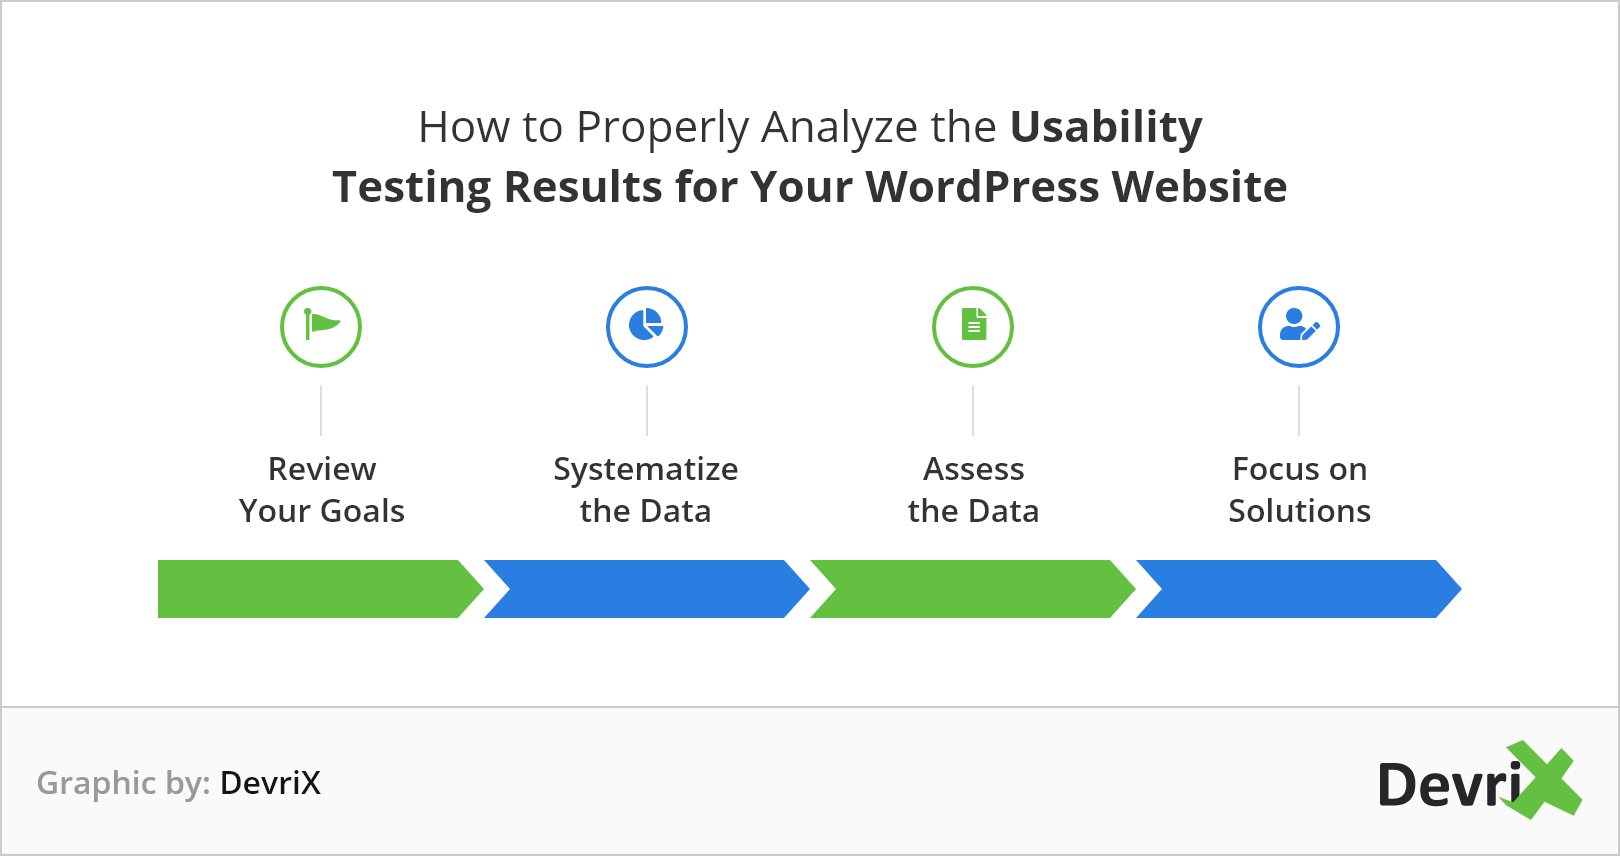
The best way to improve the usability of your WordPress website is to turn analysis into actionable steps.
- Review Your Goals – Check your goals and remind yourself of what you wanted to discover in the first place? See if the feedback is relevant to your goals and if it corresponds with the tasks that you asked the testing group to perform.
- Systematize the Data – Examine the notes, data, and test recordings carefully. See what kind of obstacles the users have faced when executing the tasks and review their comments. Make an individual note for each issue and afterward, categorize them into a spreadsheet.
- Assess the Data – Evaluate every piece of data from the tests. Analyze why some of the site issues still exist, and how you can optimize and improve them.
- Focus on Solutions – Analyze the usability problems that you’ve discovered, and their seriousness in the site’s conversion rate. Focus on resolving them immediately, because even a minor issue can turn into a major challenge if left as a secondary concern.
After you’ve carried out the necessary changes, never stop testing the site’s features and their effect on the usability. Continuously collect feedback and optimize your WordPress website.
Besides Crazy Egg, other useful tools can help you test the usability of your WordPress website: Google Optimize, Usabilia, Optimizely, HotJar, UserZoom.
Test the Browser Compatibility
Every user has a preferred browser. Each respective browser utilizes a separate layout engine that renders the code differently. Firefox uses Quantum, Chrome and Edge are using Chromium, and Safari is using WebKit.
These variations in rendering can make the code adjustments a real challenge. You can prevent that from happening only by testing the compatibility of your WordPress website for the most popular browsers. It can confirm that your site is working correctly on every browser, screen, device, and OS.
First thing first, you need to examine which browsers your website visitors use the most. For this purpose, you can use Google Analytics. Log into your account, and access Audience > Technology.
When you know from which browser your site is visited the most, you can focus on optimizing your website for that.
Also, you should not forget about the operating systems If you’re using a Mac, you won’t be able to check how the site renders in Windows-based devices, and oppositely. Fortunately, some tools can help you out to continue testing your WordPress site’s compatibility for both browsers and OS, in this case:
- Browsershots: An open-source tool that allows you to test your website for different browsers and operating systems. It is user-friendly and completely free. However, it can only take screenshots from your website, which means that you can’t see how the site works live during the test.
- BrowserStack: A browser testing tool that provides you with live-testing and screenshot-based tests. You can choose how you want to test your site and proceed. The tool offers a virtual site emulator that previews your website. Just type the site URL and begin the test.
Run a Performance Test
Now, let’s be clear, WordPress is a powerful CMS to opt for, and combined with a robust hosting, it’s 99% unbreakable during any amount of traffic loads. But, there are many situations, for example, a specific holiday or having a popular product on your site that will cause a massive traffic spike.
In those situations, you must ensure that your website is at a peak performance level. As a starting point for testing the maximum traffic load, we recommend you to try some of the following tools for the purpose:
You can test the speed of your website with some tools that can help you learn where to optimize, such as PageSpeed Insights, Pingdom, or GTMetrix. They work similarly by pasting the URL of your site and scanning it for performance bumps. You can use the reports to take active measurements towards speed optimization.
Read our complete Google PageSpeed Insights tutorial to learn more about optimizing the speed of your WordPress website with the tool.
How to Analyze Your Web Page Performance Using Google PageSpeed Insights
The bottom line, you need to test the performance consistently as your website grows both in features and visitors. If tests tell you that your site can withstand 10,000 visits per day, what will happen if suddenly 1,000,000 want to visit your website at once? Your traffic can always pick up, we know the best, scaling clients with hundreds of millions of traffic on their sites.
Conduct Security Tests
Conducting a security test for your WordPress website can help you stay vigilant and put a stop to website attacks. Regular security checks can consist of several tasks that need to be performed systematically.
Check for Updates
Updating your WordPress site is extremely important towards keeping it safe. It fixes vulnerabilities, enhances features, and it improves the performance of your website.
Always make sure that the Core and plugins are updated. Check for updates by logging into your site and navigating to ‘Updates’.
Check the Passwords and Users Info
Next up, you need to examine the user accounts by navigating to Users → All. If you’ve allowed multiple users to act as admins or content creators, again, check if some accounts look questionable to you. When an account is suspicious, delete it right away!
For example, if you have a membership website, you should allow different users to create accounts. However, if it’s only you who runs your blog and continuously tweaks your site, you need to only have accounts for yourself and the authors, nobody else.
Scan Your Website
When any malware goes undetected, it can prowl and gather all of your information and infect it with spam emails. It can easily result in a ban or blacklisting from Google that you might not even be aware of.
Today, scanning your WordPress website for malware and vulnerabilities should not be difficult. In fact, there are tools and plugins at your disposal that can help you audit your site:
- First Site Guide Scanner: Enter your site URL and hit the Scan button. It tests whether information about the WordPress version, usernames, or failed login attempts are detectable.
- Wordfence: A tool that scans your site for more than 40,000 malwares. It examines your content, core files, plugins, themes, and matches them with the WordPress repository files.
- WPSec: A tool that owns a massive database of the most recent security threats, which allows you to detect even the most sophisticated malware on your website.
Inspect Analytics
Besides keeping track of your site’s traffic and rankings, analytics can point out significant site health issues. For example, what if you’re certain that your content and SEO are on point, but yet, your traffic numbers drop? It might mean that you’re blacklisted by Google, and there’s nothing worse than that when trying to rank and acquire organic traffic.
Test Mobile-Friendliness
The mobile-friendliness of your website can not only impact its usability, UX, and your revenue. It also has a significant effect on how the site performs in SERPs. After all, Google themselves made it well known that if websites are not mobile-friendly, their ranking will be diminished:
Starting 21 April 2015, Google Search will be expanding its use of mobile-friendliness as a ranking signal. This change will affect mobile searches in all languages worldwide and will have a significant impact on Google Search results. Users will find it easier to get relevant, high-quality search results optimized for their devices.
So, how can you test to ensure that your site is mobile-friendly?
Use Your Smartphone
Perhaps the most hands-on type of testing is to use a mobile device. Grab your iOS or Android device and test the following:
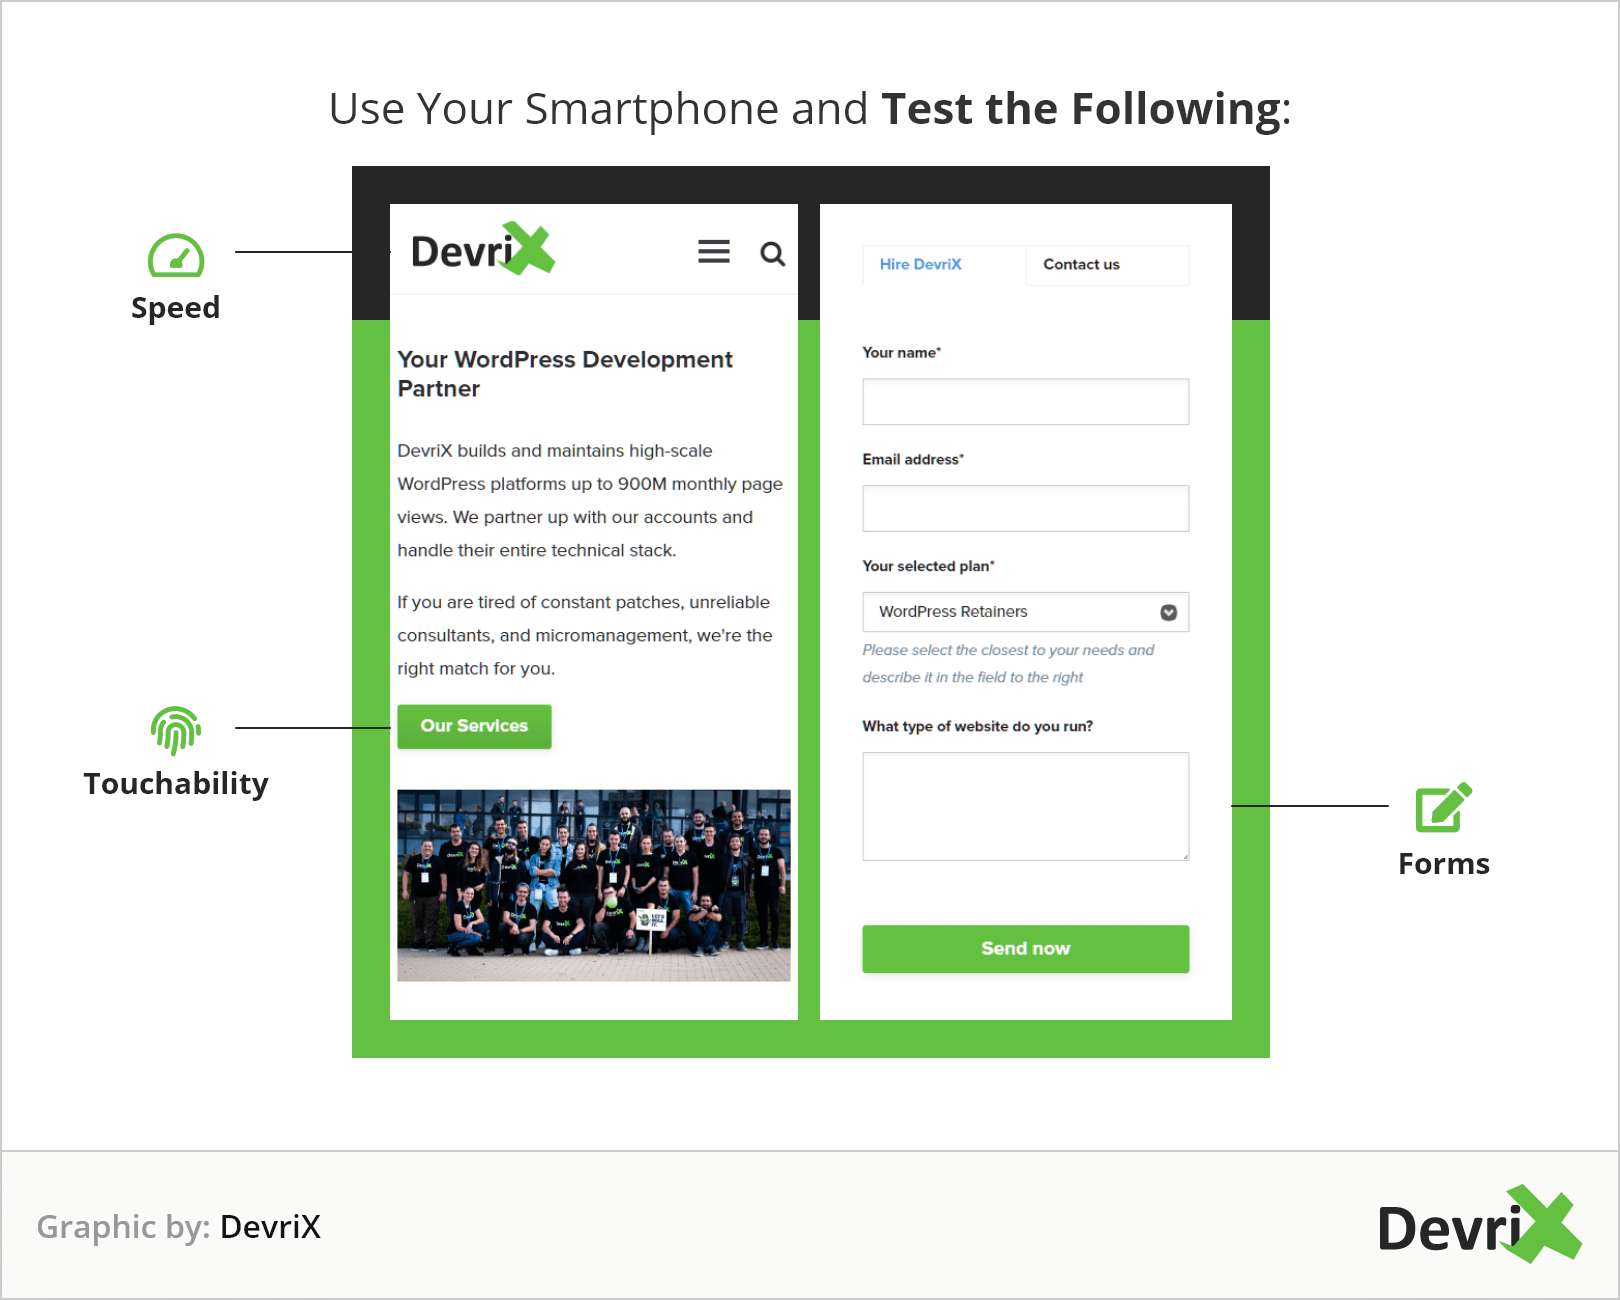
Testing the usability of the mobile version of your WordPress website on your phone is the most straightforward method.
- Touchability: Check buttons and links with your fingers, make sure everything is reachable and works. Ensure that the navigation is flawless. Also, don’t forget that different users have different finger sizes, so you need to also ensure that clickable elements are convenient for the majority of users.
- Forms: To fill out a form on mobile has never been as intuitive as on desktop. Still, you need to check if they’re working properly, if the right type of information can be entered in the fields, and if the field transitions are smooth.
- Speed: Try how the mobile version of your WordPress website works on 3G, 4G, and, if possible, 5G network as well. Make sure that the speed is adequate for each network and device.
Use Tools
A mobile-testing tool will provide you with a simulation that’s similar to your own site e. Great tools to use for the purpose are:
- Google’s Mobile-Friendly Tool: The tool is really simple to use. You just copy the URL of your site, and after a few seconds, you get results if it’s mobile-friendly or not.
- W3C Mobile Validator: The tool is useful if you want to uncover problems and errors with the mobile version of your website, and how these issues affect the users.
- Emulators: Using a desktop emulator means that you can emulate each feature of your mobile WordPress website and its behavior. Some of the best that you should try if you’re testing for different browsers are Android, iOS, and Opera emulators.
Conduct Localization Tests
Let’s say that you need to expand internationally, but, you’re not quite sure if you could successfully apply any other language besides English. There are lots of businesses that have done it, providing multilingual web experience can’t be that hard, right?
It all depends. Do you have a native French language consultant for your content team? How can you tell if something is being translated correctly? Do you even know the culture of a certain state that your target customers live in, and what type of language and tone is suitable for there?
There are many domestic and legal aspects that you need to take into account when it comes to localization, such as:
- Date and time formats
- Currency and local language
- Keyboard layouts
- Cultural symbols and colors
- Sensitive text and media content
- Local and state Legal requirements
You might need an entire department just to provide your content in each preferred language. One of the more successful examples for this is Content marketing guru Neil Patel.
Here’s how he does international SEO successfully with his team:
- He has a group of people that translates his content into a regional language.
- He looks for regional SEO experts that can write the content in a particular language.
- In exchange for growing his regional traffic, he gives the regional content team a split of the profits.
- He tests this approach 3 to 6 months for results and growth.
With all things considered, how can you go about localization testing when you want to run a site for at least two other languages? What will you localize? Only the date and time plus the numbers? Or the entire website content plus the buttons?
First of all, collect all the site text and content that you need to test. For copy such as “Home”, “Back”, “About”, or “Search”, if you localize for French or Italian native speakers, you need to enter the correct terms in the respective languages.
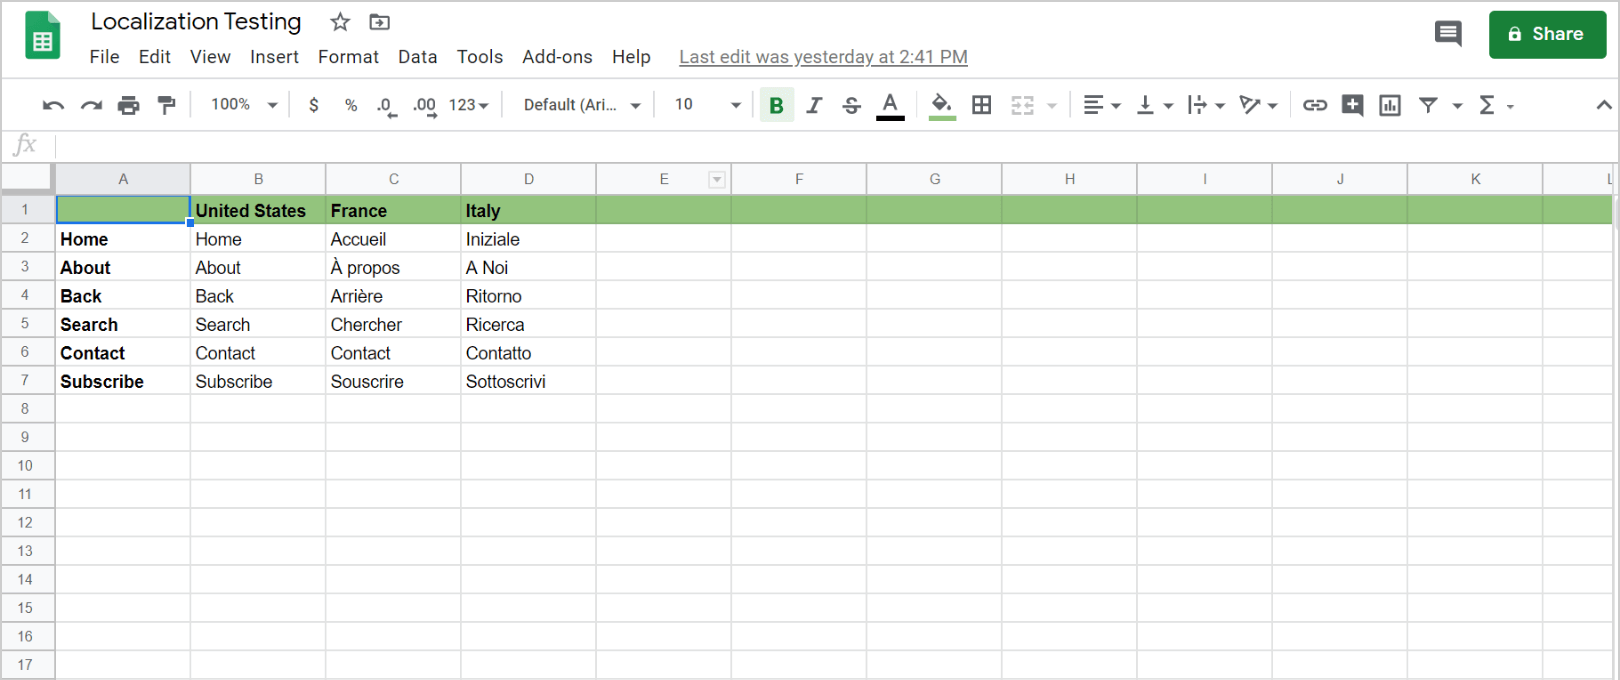
Localization Testing: Make sure that each text is adapted to the language that you’re optimizing for.
Next up, to provide the best possible QA and testing for localization, perform the following tasks:
- Update your computer’s date and time in accordance with the region that you want to target with your website.
- Ensure that each label, text, warning, and error message is properly translated according to the locale that you want to target.
- Make sure that each postal code or phone number is correctly converted in the region’s format.
- Every color, icon, or symbol must be relevant to the targeted region. If some of your original copy is considered sensitive, it needs to be interpreted correctly for the region.
- Make sure that your website is compliant with the local business and transaction legal requirements.
- Check if the most important parts of the UI are not jeopardized with the localized version of the website.
- Verify that each feature is fully accessible on the localized version of the website.
Again, categorize the results of each of the check-ups in a spreadsheet:
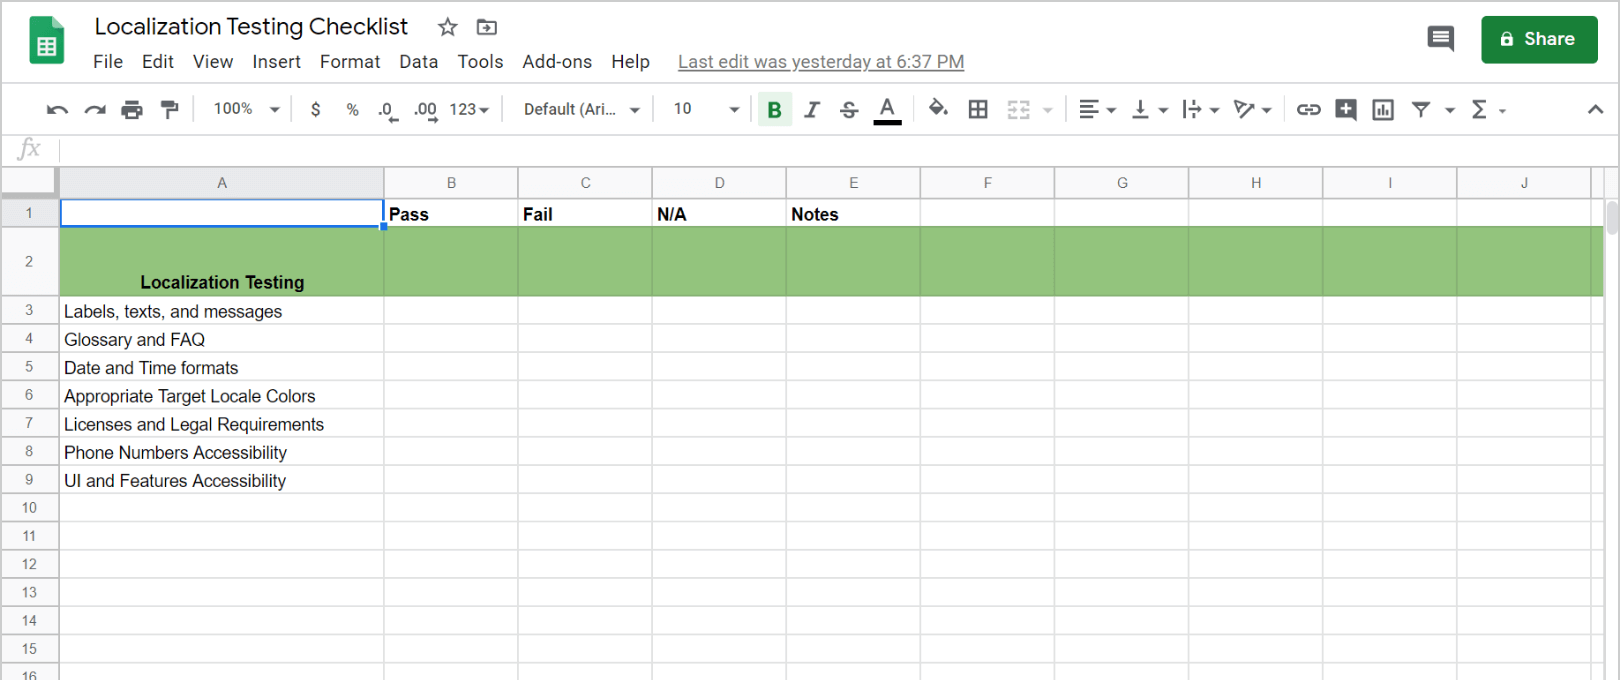
When localizing a WordPress website, you can’t test the language adaptation without a checklist.
Eventually, once you get the hang of it, you’ll want to automate a large chunk of the localization testing. To explore how to automate testing, you can try some of the following tools as a starting point, mentioned in this GlobalMe article: iMacros, Selenium, or PhantomJS.
Wrapping Up
As you can tell, testing is important for each stage of the WordPress web development process. If you run regular tests and run them right, your website will continuously improve, and your business will save tons of money in the process.
It will also help you keep your site user-focused and retain users. The most important thing is to remain consistent. Even if you currently don’t have the right skills to test your WordPress website features like a pro, every test is better than no test.
And if you think you’ve already got what it takes to step into WordPress QA and testing waters, then this article has served its purpose well, and we’ll be more than glad to see your website grow!
Moreover, if you need a dependable and professional WordPress team that can handle the development and QA process for your website, don’t hesitate to ask for our help!
If you have additional questions regarding WordPress website testing, let us know in the comments below.
Team DevriX
This article is crafted by DevriX's seasoned marketing team, boasting over four decades of collective expertise in crafting sophisticated marketing funnels, devising comprehensive content frameworks and pillars, implementing engaging email campaigns, and creating impactful social media content designed for scalability.
Our marketing experts specialize in the complete spectrum of inbound marketing strategies. As an accredited HubSpot Agency Partner and a Semrush Partner, we engage in meticulous research, blending our extensive experience with the unique insights of our highly skilled team.
We set benchmarks in content creation by incorporating cutting-edge marketing trends, leveraging in-depth industry research, and utilizing state-of-the-art AI tools for data segmentation and captivating content hooks. Our proficiency extends across a diverse range of sectors, including working with SMEs, Fortune 1000 companies, global B2B brands, major publishing entities, WooCommerce platforms, business directories, and affiliate networks.


